Welp... the basement flooded again. Not nearly as bad this time, and unlike last time, this event was 100% my fault. In an effort to "foolproof" the sump pump system for the coming spring season, I had recently installed a triple-redundant array of pumps (two 120v and one 12v backup), each with all new PVC lines and couplings. Unfortunately for me, I didn't properly tighten one of the hose clamps on a rubber coupling, and after the first 24 hours of operation (during which time I had been checking on it religiously) it came apart. For the next 36-48 hours or so until we discovered the problem, every time the pump kicked on, it was spilling water directly into the basement... Ugh.
So that really sucked. Luckily, cleanup wasn't quite as bad, and we should be able to salvage the carpet. But, it will be a few weeks of off-and-on rework down in the basement, which will of course take time away from the project. Oh well, that's life I suppose.
Things that we have gotten accomplished since the last update: nothing really measurable, hence the lack of posts over the past month. We've been filling and sanding on the overhead console, switch pod, and center console pieces. It's coming together, but motivation has been slipping a bit too due to all the other things going on. We'll get through it, eventually.
One other thing we got done was take the engine over to Poplar Grove Airmotive near the Rockford, IL area for assembly and testing. I spent more time than I thought would be necessary to inventory all of the parts in the days leading up to the road trip over there. By the time I was done inventorying everything, I had an SUV completely filled with boxes, and an Excel spreadsheet that itemized every single part and its current condition (new, overhauled, as-removed, etc).
I ran into a couple minor snags with the folks at Poplar Grove, but I'm pretty sure we'll be able to work everything out. I had no trouble making the 3.5-hr drive over there, and unloading all the parts and check-in was a breeze. I headed for home thinking all was well. The next day, however, I got an alarming phone call. They don't deal much with the experimental aviation side of things, and they were expecting many of the parts like the new fuel system (overhauled by Airflow Performance) to have yellow tags with them. Since the overhaul was experimental, those tags don't exist, and for a moment there I thought that might be a show-stopping problem. After some negotiation and explanation though, they were able to accept everything as-is, and I think I narrowly avoided having to drive back over there to collect all of my parts and take them somewhere else. I still don't have a finalized quote though, since they have a backlog of several weeks before they can really look at everything and shoot me a finalized number... so I'm still sort of in a holding pattern, hoping that things will turn out as originally expected.
While we wait on the engine, we'll hopefully get a chance to finish up on all this fiberglass business. If the timing of things goes well, we'll get our engine back and ready to hang about the time we finish getting the cabin cover and doors all fitted and glassed... we'll see if that happens!
Showing posts with label Engine. Show all posts
Showing posts with label Engine. Show all posts
Monday, March 21, 2016
Thursday, February 4, 2016
Engine Update - More Fiberglass
So I've been pretty consistently lazy with updating the blog lately, sorry about that. I guess it isn't as fun spending days and days doing layups, sanding, filling, sanding, filling, doing more layups, sanding, filling, then throwing the whole thing away and starting over.... haha. But we're learning. There just isn't that much that's happened yet that makes for an interesting blog post, which I feel is somewhat in contrast to the progress we sometimes make following along in the plans and completing all the steps in order. I feel like I haven't even looked at the plans at all in at least a month now!
Before I get to the fiberglass, a quick note on the engine. I believe I've mentioned in the past that one of the parts of this build that I was excited about the most was overhauling/building the engine myself. Being a "car guy" and having overhauled many car engines in the past, I was very excited about the prospect of doing the same on the RV-10. However, as time has gone on and we've made it this far, a thought started to occur to me that maybe it would be a better idea to let the pros handle this. I mean after all, with all the time, money, blood, sweat and yes tears put into this project so far, why put the whole project in jeopardy by attempting to do the engine myself? Although these Lycoming engines are quite simple in design, anyone familiar with them will tell you there are a surprising number of gotchas and tricks-of-the-trade that only the professionals who do this every day really know how to handle.
And even the pros have trouble sometimes! I became familiar with a situation not too long ago involving a locally-owned airplane having some engine trouble at an airport a few hundred miles away. Luckily the pilot fought the urge to "get home and check it out" and decided to stay on the ground, quickly realizing that the engine actually had a major issue, requiring a complete and immediate overhaul. The engine was a mid-time Lycoming that had been previously overhauled by a top-notch and very experienced mechanic. I personally saw the look of disappointment and confusion on his face when he heard the news. It's very likely that the problem had nothing to do directly with the quality of work that he performed, but even so, his look and attitude towards that situation certainly left an impression.
I tell that story because that was sort of the beginning of the end for me with respect to building the engine myself. The more I thought about it, the more I became certain that this was a task best handed off to someone more experienced and capable. So, I called around to a few places and have made plans to bring my setup to Poplar Grove Airmotive in Poplar Grove, IL. They are a well-respected engine overhaul shop and come highly recommended by several pilot friends who have used their engine overhaul services. They quoted me what seems to be a fair price for engine assembly and dyno testing, and hopefully what I get back from them will be a zero-time, fully airworthy and reliable engine ready to perform for us.
So in preparation for sending the engine into their shop, I've placed a few orders for the parts I still need to make this engine complete. These include bearings, gaskets, hoses, nuts and bolts, as well as some additional components. Some of the bigger-ticket items include the starter and two B&C alternators (BC460-H and BC462-3H), as well as overhauling the fuel servo, fuel pump and flow divider by Airflow Performance. Hopefully, I'll have a complete stack of parts ready to go by the end of the month, and I can haul it all over to IL to get that process started!
In the meantime, we're continuing with our work on fiberglass. I started making the center console/quadrant/armrest, and tried to take a few pictures along the way:
NOTE: It will be painfully obvious that the design of this console is "inspired" by the new Aerosport "Quad Console" armrest... it can probably best be described as a poor-man's homemade version of it. Hopefully it will be just as functional andjust nearly as pretty when complete!


Before I get to the fiberglass, a quick note on the engine. I believe I've mentioned in the past that one of the parts of this build that I was excited about the most was overhauling/building the engine myself. Being a "car guy" and having overhauled many car engines in the past, I was very excited about the prospect of doing the same on the RV-10. However, as time has gone on and we've made it this far, a thought started to occur to me that maybe it would be a better idea to let the pros handle this. I mean after all, with all the time, money, blood, sweat and yes tears put into this project so far, why put the whole project in jeopardy by attempting to do the engine myself? Although these Lycoming engines are quite simple in design, anyone familiar with them will tell you there are a surprising number of gotchas and tricks-of-the-trade that only the professionals who do this every day really know how to handle.
And even the pros have trouble sometimes! I became familiar with a situation not too long ago involving a locally-owned airplane having some engine trouble at an airport a few hundred miles away. Luckily the pilot fought the urge to "get home and check it out" and decided to stay on the ground, quickly realizing that the engine actually had a major issue, requiring a complete and immediate overhaul. The engine was a mid-time Lycoming that had been previously overhauled by a top-notch and very experienced mechanic. I personally saw the look of disappointment and confusion on his face when he heard the news. It's very likely that the problem had nothing to do directly with the quality of work that he performed, but even so, his look and attitude towards that situation certainly left an impression.
I tell that story because that was sort of the beginning of the end for me with respect to building the engine myself. The more I thought about it, the more I became certain that this was a task best handed off to someone more experienced and capable. So, I called around to a few places and have made plans to bring my setup to Poplar Grove Airmotive in Poplar Grove, IL. They are a well-respected engine overhaul shop and come highly recommended by several pilot friends who have used their engine overhaul services. They quoted me what seems to be a fair price for engine assembly and dyno testing, and hopefully what I get back from them will be a zero-time, fully airworthy and reliable engine ready to perform for us.
So in preparation for sending the engine into their shop, I've placed a few orders for the parts I still need to make this engine complete. These include bearings, gaskets, hoses, nuts and bolts, as well as some additional components. Some of the bigger-ticket items include the starter and two B&C alternators (BC460-H and BC462-3H), as well as overhauling the fuel servo, fuel pump and flow divider by Airflow Performance. Hopefully, I'll have a complete stack of parts ready to go by the end of the month, and I can haul it all over to IL to get that process started!
In the meantime, we're continuing with our work on fiberglass. I started making the center console/quadrant/armrest, and tried to take a few pictures along the way:
NOTE: It will be painfully obvious that the design of this console is "inspired" by the new Aerosport "Quad Console" armrest... it can probably best be described as a poor-man's homemade version of it. Hopefully it will be just as functional and

Spent many DAYS making a foam "plug" that will be used to make the center console.

Random photo of the adhesive being used to bond the foam: Glidden Gripper primer! I found this trick from watching a youtube video where several different adhesives were used for comparison. Many traditional adhesives will actually melt the foam and can't be used, leaving few alternatives that actually make a good bond... this stuff works great, and cleanup is painless!
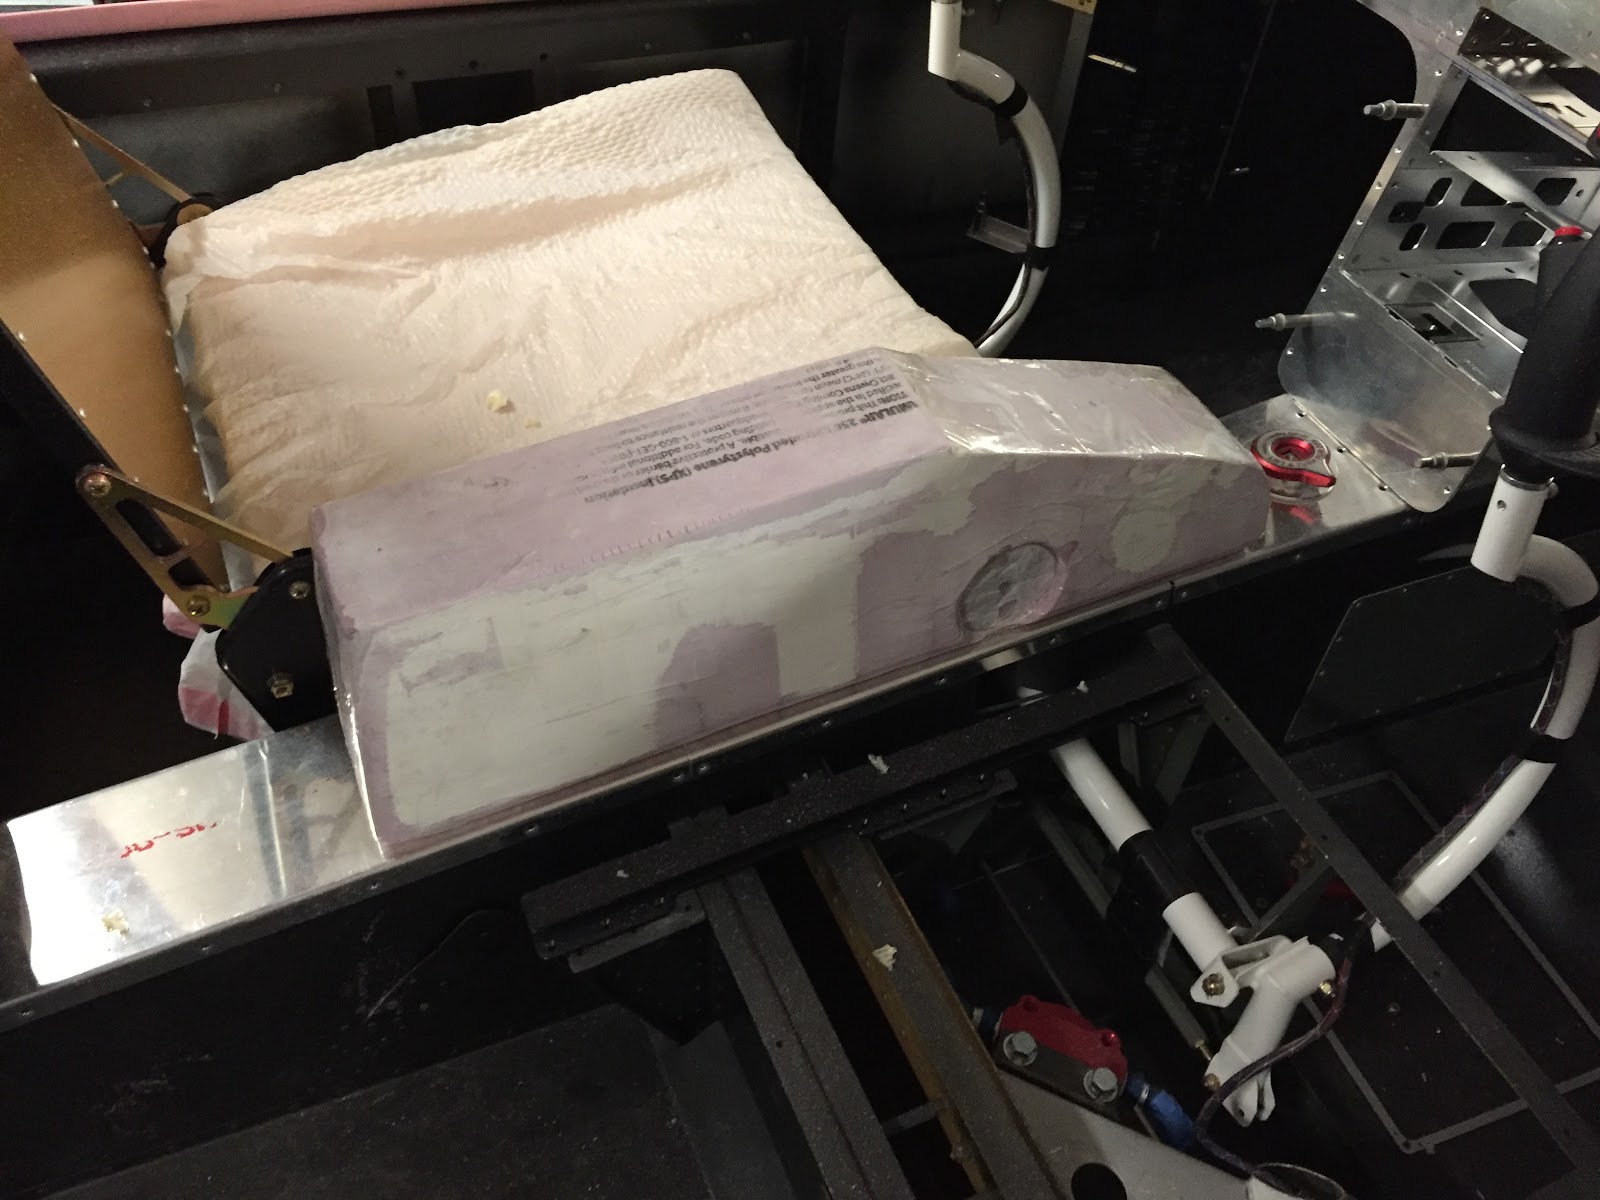
Approximate location on the tunnel. The throttle quadrant will be in the slanted forward part, and there will be a padded armrest cover that opens into a storage box (big enough to hold a sectional chart!) inside the main area.

After layups and initial trim: The console is made in two separate halves, one slightly overlapping the other, so that they can be removed from the plug and then bonded together as a hollow piece.

The first few clecos being installed to clamp it together for bonding
Since these photos were taken, the console has been bonded together, sanded, filled, and then cutouts have been made in the top, front and back for various panels and openings. It's coming together, but man this isn't something that can just be built in a day.
Other parts coming along are the "A-pillars" in the cabin cover, which I've successfully run conduit through and sealed in place with spray foam. I shaped the foam to approximate what I wanted and then put a single layup over it. This has resulted in an EXTREMELY wavy base layer, on top of which I will need to fill and sand everything to become smooth and properly contoured. I'll try and post some photos of that endeavor next time.
We have some plans coming up over the next week or two, so I wouldn't count on much work getting done on the plane until maybe after Valentine's day or so... but I will keep trying to find some time to post updates!
Saturday, June 28, 2014


Wednesday, June 11, 2014
Engine purchase
I consider myself an automotive "engine guy," and know my way around automotive engines quite well, having rebuilt well over a dozen of them over the years (mostly Chevy big & small blocks, as well as a couple others). Aircraft engines, however, are completely new to me-- and the idea is not lost on me that the bar is set quite a bit higher with these engines than what I may be used to, especially when it comes to safety tolerances and redundancy. Still, for me, part of the attraction of building my own plane is to also build my own engine, and that is what I have set out to do.
On the back burner, I've been searching online for the "perfect" Lycoming IO-540 engine. I wanted it to have relatively low total time, and be in running condition but perhaps be close to overhaul time. I found an IO-540-J4A5 for sale in FL that came off an Aztec and seemed to meet the criteria I was looking for. A notable feature of the -J4A5 variant is that it is actually a turbo-normalized engine-- the only turbo model that Lycoming made (to my knowledge) that did not bear the TIO- prefix.
Before you go find the "flying high and fast" aka "tubos are bad for RV's" link and email it to me, I have no intentions of actually installing this engine on the aircraft with the turbo. In fact, this particular engine is unique in several ways. The crankshaft, rods, and pistons are all the exact same part numbers as for the non-turbo engines such as the Van's recommended -D4A5. In fact, the compression ratio is exactly the same as well. My plan is to run this engine normally-aspirated, and apart from a few minor differences it should be pretty close to parts-equivalent to the -D4A5. These are the only meaningful differences I am aware of at this time:
Most of these differences I consider to be unimportant, and additionally I should have a number of unused parts (turbo, servo, magnetos, etc) that I will be able to sell later on and hopefully recoup some of the purchase price of the engine. We'll play a lot of this by ear as time goes on, but the important part for me is that we have the engine now, and have plenty of time to deal with part-swapping as time goes on.
Anyway, here's the info on the engine itself: it has complete logs with 3046.7 hours total time, 1503 hours since major overhaul, and only 123.5 hours since a new top end (cylinders) had been installed. It did have a prop strike, but the seller was willing to guarantee the case, crank, and cam to be serviceable, as well as have an A&P/IA perform a "prop strike inspection" (more on this later), two fresh overhauled magnetos, and a sign-off for return to service. Basically, this engine could be bolted right back onto the front of an Aztec and fly away. Of course, my plans for it were a bit more involved.


Over the next few weeks, I plan to tear it down and ship the parts off to the various overhaul shops around the country. I will be rebuilding it myself and returning everything to factory new tolerances, with a few experimental upgrades such as EFI and electronic ignition. Ideally, I'd love to home-brew that system but time, money, and comfort/safety may dictate otherwise. Plenty of time to figure this out... we'll see how this goes.
On the back burner, I've been searching online for the "perfect" Lycoming IO-540 engine. I wanted it to have relatively low total time, and be in running condition but perhaps be close to overhaul time. I found an IO-540-J4A5 for sale in FL that came off an Aztec and seemed to meet the criteria I was looking for. A notable feature of the -J4A5 variant is that it is actually a turbo-normalized engine-- the only turbo model that Lycoming made (to my knowledge) that did not bear the TIO- prefix.
Before you go find the "flying high and fast" aka "tubos are bad for RV's" link and email it to me, I have no intentions of actually installing this engine on the aircraft with the turbo. In fact, this particular engine is unique in several ways. The crankshaft, rods, and pistons are all the exact same part numbers as for the non-turbo engines such as the Van's recommended -D4A5. In fact, the compression ratio is exactly the same as well. My plan is to run this engine normally-aspirated, and apart from a few minor differences it should be pretty close to parts-equivalent to the -D4A5. These are the only meaningful differences I am aware of at this time:
- The -J4A5 uses Bendix 1200-series magnetos instead of the Slick used in the -D4A5.
- The -J4A5 uses a gear-driven fuel pump instead of the more common pushrod drive
- The -J4A5 has piston-cooling oil jets-- something necessary for a turbo'ed engine but I believe will have significant benefits for NA as well. It may cause higher oil temperatures, I hear, but that can be mitigated with an improved oil cooler, if necessary.
- The -J4A5 has different mounting ears than the desired #70456 to mount to an RV-10. I'll be on the lookout to pick up a set of these at some point.
- The fuel injection servo is tuned differently to work with the turbo.
Most of these differences I consider to be unimportant, and additionally I should have a number of unused parts (turbo, servo, magnetos, etc) that I will be able to sell later on and hopefully recoup some of the purchase price of the engine. We'll play a lot of this by ear as time goes on, but the important part for me is that we have the engine now, and have plenty of time to deal with part-swapping as time goes on.
Anyway, here's the info on the engine itself: it has complete logs with 3046.7 hours total time, 1503 hours since major overhaul, and only 123.5 hours since a new top end (cylinders) had been installed. It did have a prop strike, but the seller was willing to guarantee the case, crank, and cam to be serviceable, as well as have an A&P/IA perform a "prop strike inspection" (more on this later), two fresh overhauled magnetos, and a sign-off for return to service. Basically, this engine could be bolted right back onto the front of an Aztec and fly away. Of course, my plans for it were a bit more involved.
The giant, heavy crate arrives that contains my 'new' engine! It was very well packed.
All removed from the crate and placed on the stand.
Side view of the engine prior to disassembly.
Over the next few weeks, I plan to tear it down and ship the parts off to the various overhaul shops around the country. I will be rebuilding it myself and returning everything to factory new tolerances, with a few experimental upgrades such as EFI and electronic ignition. Ideally, I'd love to home-brew that system but time, money, and comfort/safety may dictate otherwise. Plenty of time to figure this out... we'll see how this goes.
Subscribe to:
Posts (Atom)