Showing posts with label Wiring. Show all posts

Tuesday, January 19, 2016

Odds & Ends

So it's been a while since the last update. Things are going well, but slowly. We've been working on sanding the inside of the cabin cover, installing conduit along the front "A-pillars" and "B-pillars", and filling in the voids with spray foam to then cover with fiberglass. I'm also trying to come up with the desired shape for the overhead switch panel, which will contain all my lights and dimming controls. I received my switch and terminal order from Digikey the other day, so I took a piece of scrap aluminum and quickly made a (very) rough mockup of what I had envisioned for the switch panel:

Overhead switch panel, v0.0.1

It came out "okay"... I think there needs to be a bit more room vertically between the dimmers and the switches, and also maybe just a smidge more space between each toggle, although I can live with it as-is. The idea will also be to have both the upper and lower edges of the panel curved, to better fit in the given space and give it kind of a more elegant look. At least that's what I'm going for-- it may very well end up looking like some kind of super-cheesy clown smile instead. We'll see.

I need to figure out how to illuminate these too. Right now the thought is to make a piece of clear acrylic that is painted a solid opaque color, and is then etched to allow light to pass through for all the legends and graphics. Another option would be to get a panel made from a place like engravers.net and backlight them with LED's. Although I like that idea (and I've seen some really sweet-looking panels made this way), I'd like to first try the acrylic method and see how far I can get. This will be on a growing list of back-burner projects that I'll get to, eventually.

Continuing on the electrical side of things, I also received my order for 12V accessory plugs. I kind of "splurged" on this and went with the VW/Audi parts that I've seen discussed on the forums. They're pretty slick-looking-- they have a spring-loaded door with "12V" marked on the front, and should provide a nice finishing touch to the interior when it all comes together. I'd take a picture, but one of the parts I received was incorrect and I'll need to exchange that out before I can move forward on this. There will be a total of three outlets in the plane: one for each of the two front passengers, and a third in the middle for the back seat.

I'm also working on preparations for the avionics. Specifically, I'm drafting all of my own wiring diagrams for the plane using the program Kicad, an open-source schematic capture and PCB layout program I've used for quite some time on a number of different projects. This is of course BY FAR the biggest of those projects, and it's going to take many weeks (if not months) to finalize a wiring diagram before I can actually cut, strip and crimp my first wire. The diagram will be comprehensive in nature and cover all of the avionics interconnects (of which there are many hundreds) as well as ship's wiring for things like lights, trim, flaps, etc etc. It's a fun task (yes, I actually enjoy this stuff) but it's also very tedious and does take a long time. It also has a tendency to make me cross-eyed after a few hours of reading through the thousands of PDF pages of install manuals and datasheets, trying to figure everything out. I'm getting there, slowly but surely!

Alright, I've talked enough. Here's a few pictures of many of the other accomplishments made this last week:

Rigged up the GSA28 pitch servo, and installed the optional Van's RV-10 ADAHRS tray to hold another GSA28 servo for the yaw damper. Fabricated a bracket to hold the yaw damper bellcrank, centered behind the elevator bellcrank. I'll probably re-make the ADAHRS tray itself out of thicker material and extend it forward slightly so I can also mount my GDL39R ADSB box. I also re-made the yaw damper arm into a more "boomerang" shape that has slightly different geometry that will work better with the movement of the rudder cables. I'll make a full post about the yaw damper and all the parts used to construct it once it's finalized.

Installed the Tosten stick grips... yay! I may cut another bit off the sticks to bring them down just a tad more. I started with them in a little high because... well... you can always cut more off but it's real hard to make them taller again!


Lastly, a quick montage of cutting out the rear NACA vent holes. Thanks to my friend Derek for stopping over and taking some of the action shots :-)
Traced the front NACA hole onto a piece of Lean Pockets cardboard, cut it out, and then traced it on this location in the aft fuselage skin. The vertical line shown is 10" back from (and parallel to) the seam between the mid fuse side skin and the tailcone, with a centerline drawn between the two rivet lines.


Me getting started with the cut using a Dremel tool

Cut almost done...

After a bit of filing, it looks great! Just the same as the holes in the front... woo!

That's it for now... until next time!


Monday, August 24, 2015

Steps and Aft Flooring

Time for some pics! Final-installed the steps and ran wiring conduit today, bringing us one step closer to being ready to rivet on the aft floors. I started this by modifying the TCW Step Bushings I ordered to facilitate installation. The plans they come with suggest to use a rope or strap to "drop" the bushings into place, but I had an idea to tap a 3/8" threaded hole in the middle of the bushing so that it could be attached to the end of a threaded rod, allowing push/pull force to be applied as the bushing is inserted. It will also make future removal of the bushing possible, should that be needed.

Drilled 5/16" hole and beveled

Tapped 3/8-16!

With the bushings tapped and attached to the rod, it kinda looked like an industrial-grade marshmallow on a stick! Except not as delicious. Anyway, I also ended up re-drilling the holes through the steps so that the bolt slides in horizontally instead of vertically, so that they can be removed with the floors in place. I also upgraded to an AN4-20A bolt instead of the default AN3 size. After a quick drilling, deburring, and priming session, the steps made their way into their final spot and got bolted into place. Looking at the empty original hole on top of the mounting collar, I then realized I could take a small AN3-5A bolt and carefully drill/tap it into the bushing from the top side, giving an extra degree of shear strength too. This small bolt will still be removable from the bottom should the need ever arise.

L Step final-installed-- Silver powdercoat looks slick!

R Step from the inside


AN4-20A bolt horizontally through the whole tube with washer/nut on other side, and an AN3-5A bolt on top, tapped into the bushing and secured with blue threadlock. Where's this step going? Nowhere!

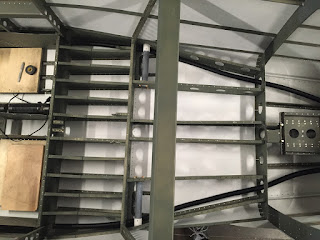
After that, I ran some 1" conduit through the baggage and rear seat areas, one on each side. The conduit fit quite nicely through the holes I had drilled, and I reinforced the tube at each passthrough with a few layers of Super33+ electrical tape, and secured with a zip tie. Should hold up very well!

Conduit runs through each side

Conduit runs through each side. Oh yeah, there's my modified battery tray too! :-)

Zip tie over Super33+ tape securing tube in place at each passthrough

That was pretty much it for today! I still need to prime the aft floor parts, will hopefully get to that tomorrow. Then all that's left to do is insulate under the seats and start putting it all together!


Wednesday, June 17, 2015

Fwd Fuse Ribs & Bottom Skin

More good progress on the forward fuse section tonight! Picked up where we left off yesterday and finished up match-drilling the F-1043 Fwd Fuse Bulkhead parts and control column mount, then taking everything back apart for deburring. The next steps then involve all-new parts, this time for the bottom skin and floor stiffeners. Took a few minutes to ensure proper orientation by squinting at the plans and making sure we were doing as instructed, ending up with this:

Fwd Fuse Bottom Skin and floor stiffeners clecoed together

Side view of forward bottom skin

Next step was to flip the assembly over and match-drill the 8 stiffeners and 3 brackets to the skins. Next we clecoed the firewall assembly and parts of the F-1043 bulkhead to the skin. Since the firewall assembly is still not 100% complete, there are a number of clecoes holding it together, which should be fine for now. I'm going to try to delay riveting it together for as long as possible to figure out what we're going to do with the center console and tunnel area. Speaking of which, the breaker panel came today!

N407ND's circuit breaker panel

It looks about exactly as I had imagined, and we'll see what we can do with this. Not yet though. In the meantime, lots more clecoing and final-drilling all the forward fuselage parts. It's coming together though!!!

Forward bottom skin with firewall and fwd bulkhead clecoed together-- it's starting to look like a proper "front office"!

R side view of the forward fuse assembly

L side view of the forward fuse assembly

Happy Mikey J!

That's pretty much it for tonight... maybe no more building until the weekend due to some plans to clean up around the house and get ready for my parents who are visiting over this father's day weekend. We'll see if I can convince them to do a rivet or two!

Monday, June 15, 2015

Breaker Panel

No building today, we instead opted to hop on the bandwagon and go watch the movie Jurassic World with some friends and family. First time at the movie theater in a while... I think I prefer the comfort of our couches and the lack of screaming children in the theater. Seriously, who brings an infant to a thriller film about dinosaurs? </rant>

Anyway.... found out today that the ebay sellers accepted my $200 offer on the breaker panel! Exciting. Hopefully this will work as planned. If not, like I said earlier at least we'll have a stack of parts we can still use.

A question popped into my mind though that I should have thought about earlier: What happened to the Cirrus this panel came out of? I'm not a very superstitious person at all, and I guess whatever happened to this panel in a former life wouldn't really bother me too much, but it would be nice to know anyway. So I googled the tail number, N407ND, which lead me to discovering an interesting "small-world" type coincidence. Back in December ('14) a Cirrus had crashed on a go-around in Colorado, after a student pilot encountered rotor downwash from a Blackhawk helicopter that had departed just moments before. A high-definition surveillance tape caught the entire incident and made its rounds through our circle of pilot friends shortly after the occurrence (link to the video here). Lots of speculation as to how much the downwash actually played into the accident, but I'll save that discussion for another time and place. Point is, the panel I bought is out of that plane... and, the accident had no serious injuries or fatalities... cool! No bad juju. My friend Mark suggested that I should still offer rum and cigars to Jobu, just in case. Might not be a bad idea.

Sunday, June 14, 2015

Firewall - Fwd Fuse Ribs - Breaker Panel Idea

Started off this morning doing some non-airplane work in the shop, finally got around to replacing some plugs/wires/cap/rotor on one of our cars that has been needing attention for a little while. Kind of a nice change of pace getting my hands greasy under the hood of a car, it's actually been a while since I've had that opportunity :-)

Anyway once that mini-project was done it was time to clean up the garage and finish deburring/scuffing the stack of firewall/fwd fuse parts in preparation for a primer session. It's not the biggest batch of parts by any means, but there is a fairly high number of odd-shaped and small/intricate parts that take some time to deburr properly. We got through it all and by late afternoon we were ready to prime. A couple quick shots of primer brought an end to a day that felt productive enough but really didn't have much visible progress.

Only other news to report, I hopped online to get more ideas about access covers/breaker panels, and I happened to find a circuit breaker panel from a Cirrus on eBay for $270. It is exactly the kind of panel I had in mind that I wanted to build for our plane, and it comes complete with ~30 push/pull breakers, ELT panel mount, and all the buss bars and misc goodies. Even if I can't end up using it on the tunnel I've still got a goldmine of parts I can use for our electrical system, when we get to that step... at least that's the theory anyway. I put in an offer for $200... we'll see if they bite :-)

For reference, and since I don't have any pics of my own to share at this stage, here's a photo of a Cirrus breaker panel similar to the one I'm talking about:

We'll see if something like this can be adapted to work on the -10. If not, we should still have a handful of usable parts well worth the price paid!

Saturday, April 25, 2015

Wings

While we wait for our connectors to arrive from Digikey, we decided to take the opportunity this weekend to switch gears a bit and focus back on the wings themselves. The bottom skins and gap fairings have already been final-drilled, but not yet deburred, dimpled or primed. Also, at some point we need to build our custom wiring harnesses for both wings. That sounded like fun work for a Saturday morning, so I got out the box of Tefzel wire I'd slowly been stockpiling:

I have a love/hate relationship with terrible puns.

The box actually contains spools from three different suppliers: Allied (the company on the box), Aircraft Spruce, and then I also have a collection of wire (mostly multi-conductor shielded) that a friend "procured" from the scrap pile at his previous employer. I'm actually really excited about the latter, because that wire is actually the same stuff they use on the big jets like Boeing and Airbus for custom and aftermarket upgraded systems. So someday I'll be able to say that some of the wiring in our plane came off the same spool as what some uber-rich dude is flying around with in his personal (and highly tricked-out) Boeing 767. Yeah, that's actually a thing. A tricked out, personal B767. I didn't believe it at first either.

Anyway, I'm getting off track. A while ago, I had drafted a schematic of the wiring needed in each wing, and written down a netlist of wires including locations to/from within each wing, gauge necessary, and color. Now it was time to actually string this together! I've always been excited to do the electrical system and wiring for this plane, maybe second only to building the engine. I have a fair amount of prior experience designing microcontroller circuits, writing firmware, and assembling custom wiring harnesses for vehicles, both professionally and as a hobby. I have a degree in electrical engineering also, as well as certifications for Mobile Electronics installation from MECP. I'm hoping I can put this knowledge to good use during the build of this aircraft!

So, off I went with the spools of Tefzel wire, stringing various sizes and colors through the ribs accoding to the schematic, and ended up with this:

L-outboard station with nav/strobe lights, taxi/landing lights and pitot heat. Garmin GAP28 pitot controller will mount in the middle of the spar extension (gray) area.


L-mid station with stall warning, OAT sensor, and puddle light.

L-inboard station has just a puddle light (total of 3 per wing at L-inboard, L-mid-front, and L-mid-outboard).

The L wing harness as it exits through the root.

The R wing harness as it exits through the root.

R-inboard station with a puddle-light

R-mid-inboard station with aileron trim servo wiring

R-mid-outboard station with aileron A/P servo wiring (for GSA 28)

R-outboard station with nav/strobe and taxi/land light circuits.

Once the wiring was complete, it was time to pull it all back out and coil it up until it's time for final installation. When the wiring is installed permanently, it will be sheathed in expandable sleeving for extra durability and a cleaner look.

That was pretty much it for today! Tonight we had our EAA chapter 33 spring social at a nice local restaurant, which was a ton of fun. We had a former B-1 test pilot as the guest speaker, and it was really awesome to hear all the stories and experiences he was able to share! Tomorrow, we'll probably continue on the wings, and maybe get the gap fairings installed... to be continued!