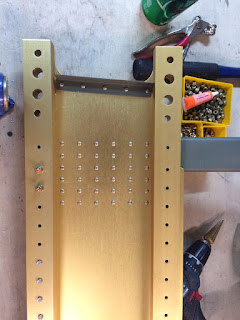
The F-1004B mid-fuse bulkhead. The hat stiffeners shown here still need to be trimmed at the bottom to allow for bucking bar clearance... will do that in the final deburring stages.
On to the third bulkhead, the F-1005 Rear Spar Bulkhead. This is a pretty stout piece, but not nearly as much as the first two, which are partially constructed at the Van's factory due to larger-size rivets and precision tolerances. This is the first structural piece of the fuselage Van's trusts us to build completely :-)
F-1005 Rear Spar Bulkhead
More of the same here, just match-drilling and countersinking as the plans require. One note, the plans have you countersink a few of the #8 screw (#19 drill) holes along the inner sides of the L/R bulkheads, but the metal is so thin that the countersink can't center very well and ends up chattering quite a bit. I know this isn't a huge issue but I wish I knew of a better way to countersink these holes. Oh well.
With the third bulkhead prepped and pulled back apart, it was time to start on the fourth and final piece of this chapter: the F-1034 Fuselage Bulkhead assembly. I swear I thought I snapped a photo of this similar to the others, but I didn't find it on the camera. Oh well, it's the least exciting of the four assemblies, with a whopping total of 5 parts and only 24 holes to drill and deburr. <Yawn>
Once all these parts were complete, it was time to have a mass-deburring, filing, and inspection party. Sarah manned (or womanned) the belt sander while I manned the drill press with scotch-brite ball. In what seemed like no time at all, we had a pretty big handful of parts ready for primer:
All the mid fuse bulkhead parts ready for primer
The seat rail supports, also ready for priming
Once everything was primed, I had a free hour or two and decided to get a bit more organized with my hardware storage bins. We've been using these storage trays available from Harbor Freight, which I think are absolutely awesome. Each compartment comes out as its own bin, so you can grab just the bins you need for a particular task and then put them back where they came from when you're done. The trouble is, we only really fully organized our hardware with rivets and a few other select fasteners, but never really got around to sorting all the AN3 hardware, screws, washers, etc. Now that the fuselage kit is here with an intimidatingly huge box of hardware, it's time to "do it right" and spend the necessary few hours it will take to get everything sorted properly. So, we spent the rest of the afternoon sorting parts and labeling bins, unpacking the fuselage hardware bags in the process. This is the less exciting side of homebulding, but hey, it's gotta be done!
Anyway, after a quick break for dinner it was time to get back to assembly. The primer had dried and we were ready to begin assembling the bulkheads.
The F-1004A Bulkhead starting to come together
36 rivets and 8 bolts (only 2 for now) per side.. these things are pretty well attached for sure!
The completed F-1004A Bulkhead assembly
By this time it was getting late, but before calling it a night I decided to cleco the next assembly, the F-1004B together:
F-1004B assembly ready for rivets... goodnight!


No comments:
Post a Comment