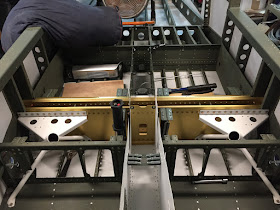
Started off this morning installing the couple hundred or so blind rivets that hold the forward floor panels into their permanent locations. This then allowed for the next step of installing the landing gear mounts:
The landing gear mounts after final installation
Close-up of L landing gear mount
A note about installing these: It takes waay longer than I thought it would to get all the bolts, washers, and nuts into place and torqued properly. I thought "eh, it's just a handfult of bolts, how hard can it be?" Trust me, it takes time. One of the more interesting parts of this is figuring out how to get the washers onto the bolts along the bottom row... the gap between the center section bulkheads is way too narrow to get your hand inside, so I used a super-long set of needle nose pliers to carefully hold the washer and put it over the bolt threads. I also used a magnetic pickup tool to grab the washers any time they got accidentally dropped, which inevitably happened a few times. In the end, patience prevailed and they are all in!
With the gear mounts installed, I put and end to Section 29 in about 5 more minutes, after riveting the F-1088-L/R fuselage ribs into place now that the floors are done. Whew!
Turning the page to Section 30 now, I picked up where I left off with the steps. The baggage floor needs to be half-installed with clecoes to hold proper alignment, and then the plastic blocks need to be match-drilled to the baggage ribs. There isn't a whole lot of room here to do all that:
The L step, with baggage floor peeled up and clamped to the upper back seat brace to gain access
In the photo above, you have to drill sideways through the plastic block on the right. So, I got out the right angle attachments and #12 bit and put together this contraption:
Right-angle drill for step mount
I made two holes on each side using this technique, and then removed everything else to gain easy access and make the final two holes. It really wasn't all that bad, and only took maybe 10 minutes. After that, the steps were re-inserted and "clocked" to the right position, which should be 45-1/4" back from the aft edge of the center section bulkhead:
Clocking the steps (measuring tape is clipped over a piece of scrap angle iron that is clamped to and coming down off the aft side of the center section bulkhead)
A couple match-drills later, holy crap we're done! I think the whole section took maybe an hour... wow! When compared to the last section, it feels pretty good! Of course, I'll still need to prime/paint/powdercoat the steps, but that will be sometime in the future.
Other than that, it's time to move on to a new section. I'm going to skip Section 31 for now (upper forward fuse/inst panel) and instead begin with Section 32 -Tailcone Attach. The main reasons for this are that I want to finish a few loose ends on the tailcone (battery tray, ELT mount, magnetic sensor mount) finished up, get them joined, and then install the casters I have to make the fuselage a "temporary taildragger" of sorts. I think that will free up the most room in the shop, and also will put us in a good position to finish up the rest of the fuselage.
So, Sarah and I went up to the front of the garage and brought the tailcone down from its resting spot on the ceiling. It was cool to set it behind the rest of the fuselage and see how it will all fit together! Sorry, no pics of that yet (it was dusty, haha). I did, however, get a jump start on fabricating the battery tray. I have an idea that I will be exploring on that front... another day!


