I have a love/hate relationship with terrible puns.
The box actually contains spools from three different suppliers: Allied (the company on the box), Aircraft Spruce, and then I also have a collection of wire (mostly multi-conductor shielded) that a friend "procured" from the scrap pile at his previous employer. I'm actually really excited about the latter, because that wire is actually the same stuff they use on the big jets like Boeing and Airbus for custom and aftermarket upgraded systems. So someday I'll be able to say that some of the wiring in our plane came off the same spool as what some uber-rich dude is flying around with in his personal (and highly tricked-out) Boeing 767. Yeah, that's actually a thing. A tricked out, personal B767. I didn't believe it at first either.
Anyway, I'm getting off track. A while ago, I had drafted a schematic of the wiring needed in each wing, and written down a netlist of wires including locations to/from within each wing, gauge necessary, and color. Now it was time to actually string this together! I've always been excited to do the electrical system and wiring for this plane, maybe second only to building the engine. I have a fair amount of prior experience designing microcontroller circuits, writing firmware, and assembling custom wiring harnesses for vehicles, both professionally and as a hobby. I have a degree in electrical engineering also, as well as certifications for Mobile Electronics installation from MECP. I'm hoping I can put this knowledge to good use during the build of this aircraft!
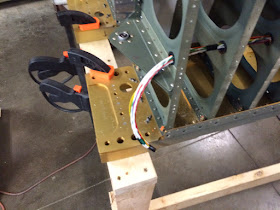
So, off I went with the spools of Tefzel wire, stringing various sizes and colors through the ribs accoding to the schematic, and ended up with this:
L-outboard station with nav/strobe lights, taxi/landing lights and pitot heat. Garmin GAP28 pitot controller will mount in the middle of the spar extension (gray) area.
L-mid station with stall warning, OAT sensor, and puddle light.
L-inboard station has just a puddle light (total of 3 per wing at L-inboard, L-mid-front, and L-mid-outboard).
The L wing harness as it exits through the root.
The R wing harness as it exits through the root.
R-inboard station with a puddle-light
R-mid-inboard station with aileron trim servo wiring
R-mid-outboard station with aileron A/P servo wiring (for GSA 28)
R-outboard station with nav/strobe and taxi/land light circuits.
Once the wiring was complete, it was time to pull it all back out and coil it up until it's time for final installation. When the wiring is installed permanently, it will be sheathed in expandable sleeving for extra durability and a cleaner look.
That was pretty much it for today! Tonight we had our EAA chapter 33 spring social at a nice local restaurant, which was a ton of fun. We had a former B-1 test pilot as the guest speaker, and it was really awesome to hear all the stories and experiences he was able to share! Tomorrow, we'll probably continue on the wings, and maybe get the gap fairings installed... to be continued!


