As for the fuel tabs, I cannot be thankful enough to the folks on VAF, in particular the people who responded to my post about the fuel quantity/height. I didn't have any bites at first, but then all of a sudden we got a number helpful responses, with one guy who actually went out to his hangar and snapped some photos and got me the info I was looking for... Thanks so much to David C (9GT)! There's a Spotted Cow with your name on it at OSH15 if you can make it :-)
Anyway with this new information, I learned that dihedral affects the fuel tanks a bit more than I had estimated it would, and the 20-gallon mark inside the fuel tank is actually 4" up from the bottom, as measured from directly beneath the inboard side of the fuel filler. Since the height of the tank near the baffle is 9", we need to come 5" down from the top skin. Accounting for a 1/8" thick fuel cap flange, that leaves us 4-7/8". So, I got to work fabricating two new tabs of that length.
Similar to the last prototype, these tabs are made from 0.050" 2024-T3 stock and measure 3/4" wide by 1/2", 4-7/8", 3/4" lengths.
The tab mounted inside the tank. With the custom fuel caps, there isn't a ton of room before it would begin to interfere with the baffle, but a slight trim is all it will need to fit just perfectly.
The tab indicates 4" up from the bottom of the tank. The measurements I'm working with came from the inboard side of the fuel flange, as opposed to the outboard side where this is actually mounted, but I can't imagine a lateral inch or two making any noticeable difference.
So that's a huge relief... we now have fuel tabs that ought to indicate pretty darn near 20 gallons! Next was to install a holder for the vent line. This is a perfect example of how deviating from the plans with something even as simple as a different gas cap can lead to further complications that need to be dealt with (The original flange is smaller, and the plans have you just mount it to one of its rivets-- this is not possible with this setup). This is obviously a pretty trivial complication, but even so it takes more time than you'd think just to invent and create a simple mounting bracket, taking all things into consideration. Anyway, after a bit of deliberation, drilling, deburring, and riveting, we had two vent mounts fabbed.
L tank fuel tab and vent holder. Before baffle installation, this piece will be bent to continue following around the fuel cap. This ought to cause it to end at nearly the absolute highest point in the tank, which is the ideal location.
Same setup on the R fuel tank.
Next, we had our first "first" for a while during the build: flaring aluminum tubing. I have some experience bending and flaring brake lines for cars, and I guess I'm ok at it... and this is very similar. But, it's still new to us and the stakes are a bit higher, I suppose. I wanted to document this as well as I could, so here goes (lots of pics):
The Rol-Air 37-degree flaring tool and a bottle of Boelube to be used on the parts while flaring
Tube protruding 5/16" through the top of the clamp, with the flaring die just making contact with the inside of the tube. The instructions say to twist the handle 6 to 7 half-turns from this point to complete the flare. Remember to put the sleeve and nut on the tubing BEFORE creating the flare... last chance!
The end of the tube after flaring.
Once the tube is flared, it fits very snugly over the nipple on the AN832 bulkhead union. Make sure the tube aligns straight with the union to ensure a good seal.
The sleeve is what translates tension force from the nut to the fitting itself once it is all tightened together.
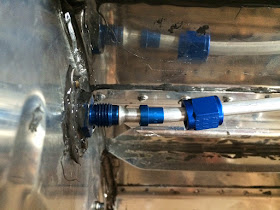
The completed and tightened fitting!
That was pretty much it for tonight, I still need to wire up the capacitive fuel probes I'm building... I've been putting that off long enough! Other than that, I believe we're just about ready to install the rear baffles... exciting times!


